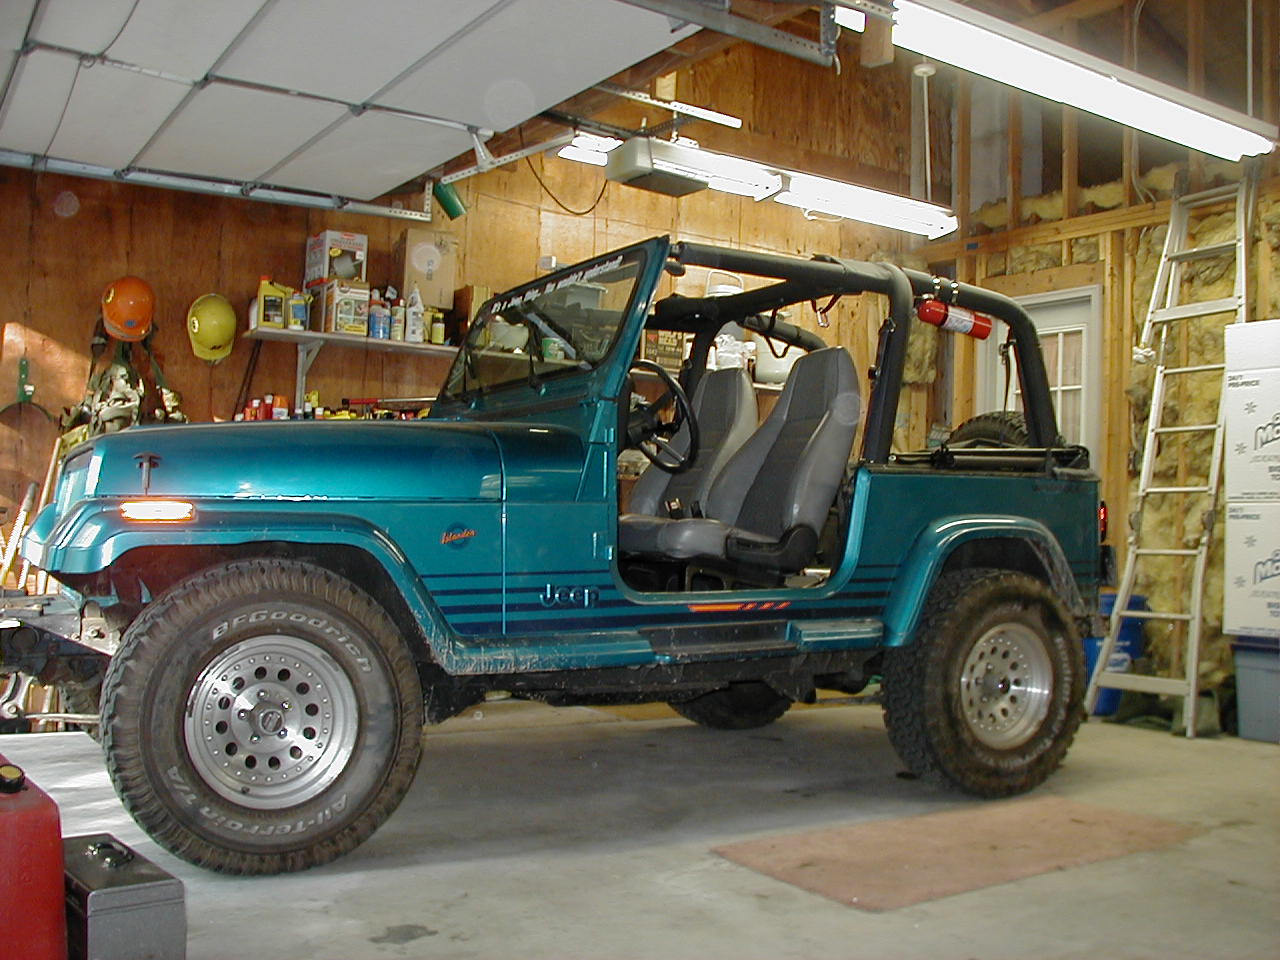
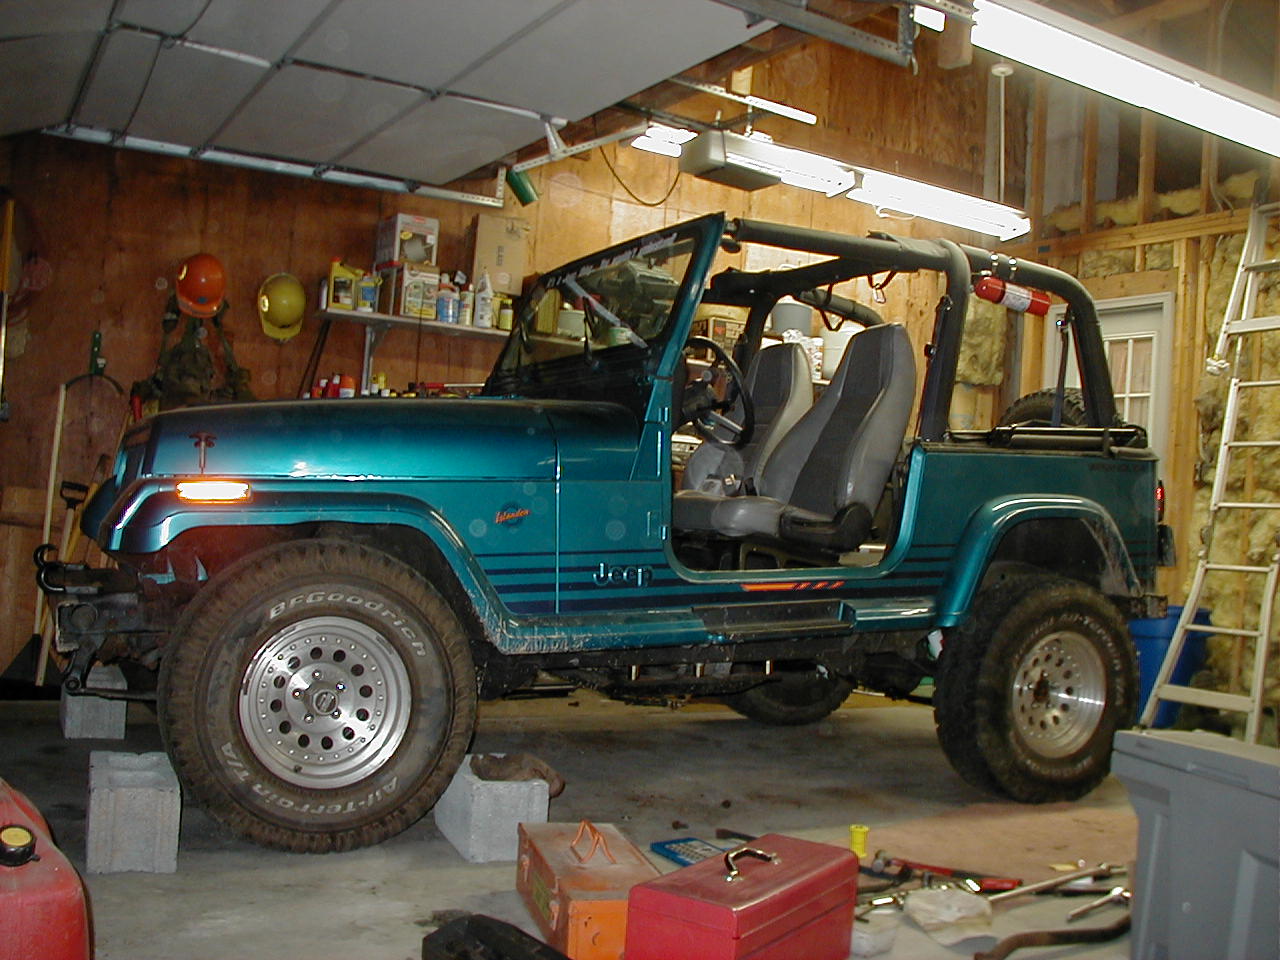
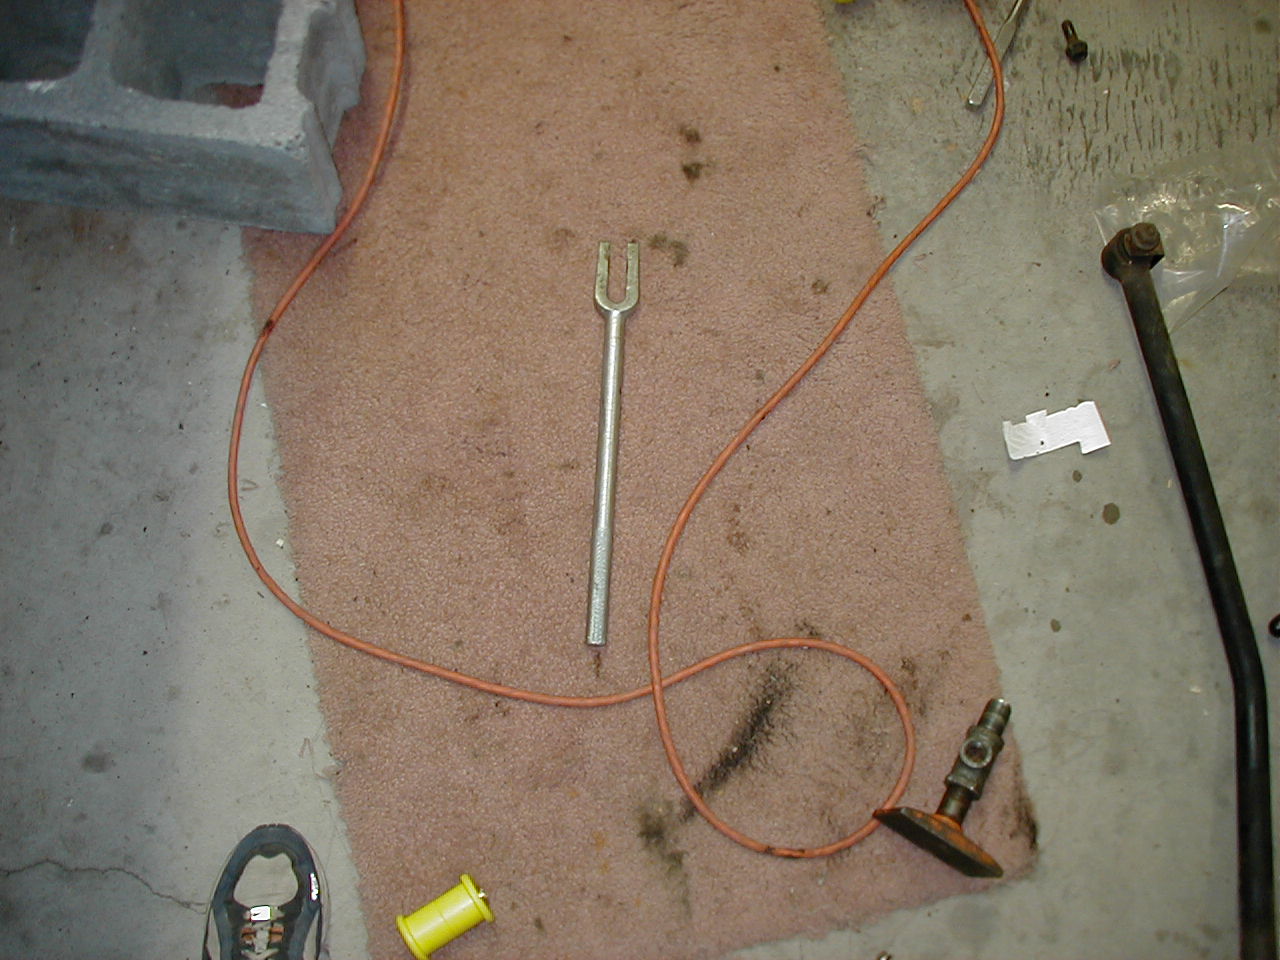
Take a good look, its all about to change!
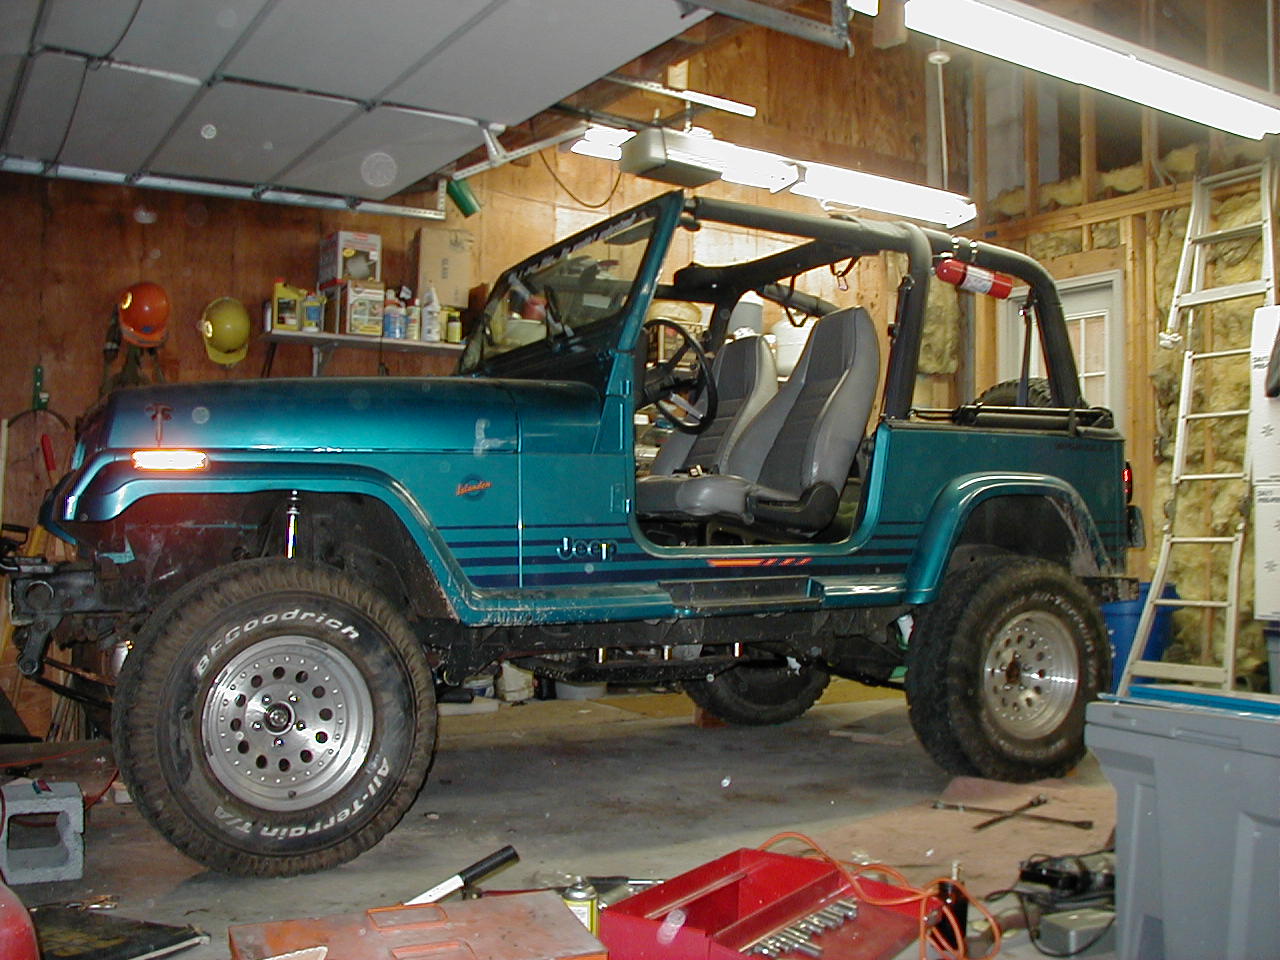
| Well, here we go. I bought this YJ on 4/21/2001 from a guy who probably never had it in 4wd. It’s suspension has been complaining ever since I broke it loose on some simple ruts. Nothing major, just enough to make the old rubber bushings complain every time I even slightly flex it. So, here we go again, I’ve got a SuperLift 3.5″ suspension lift with TrailMaster shocks sitting in my garage just waiting to be installed! |
|
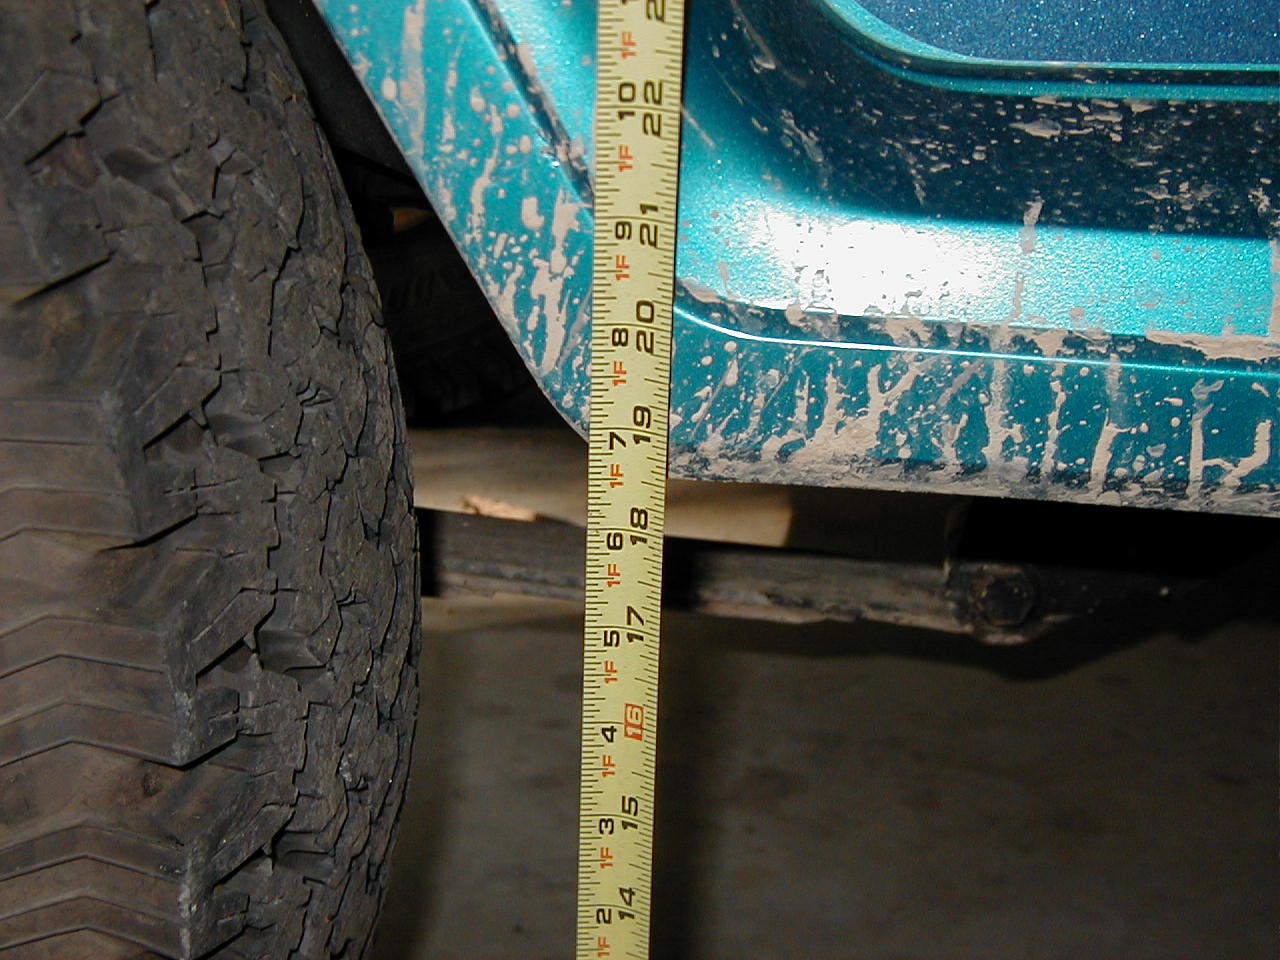 |
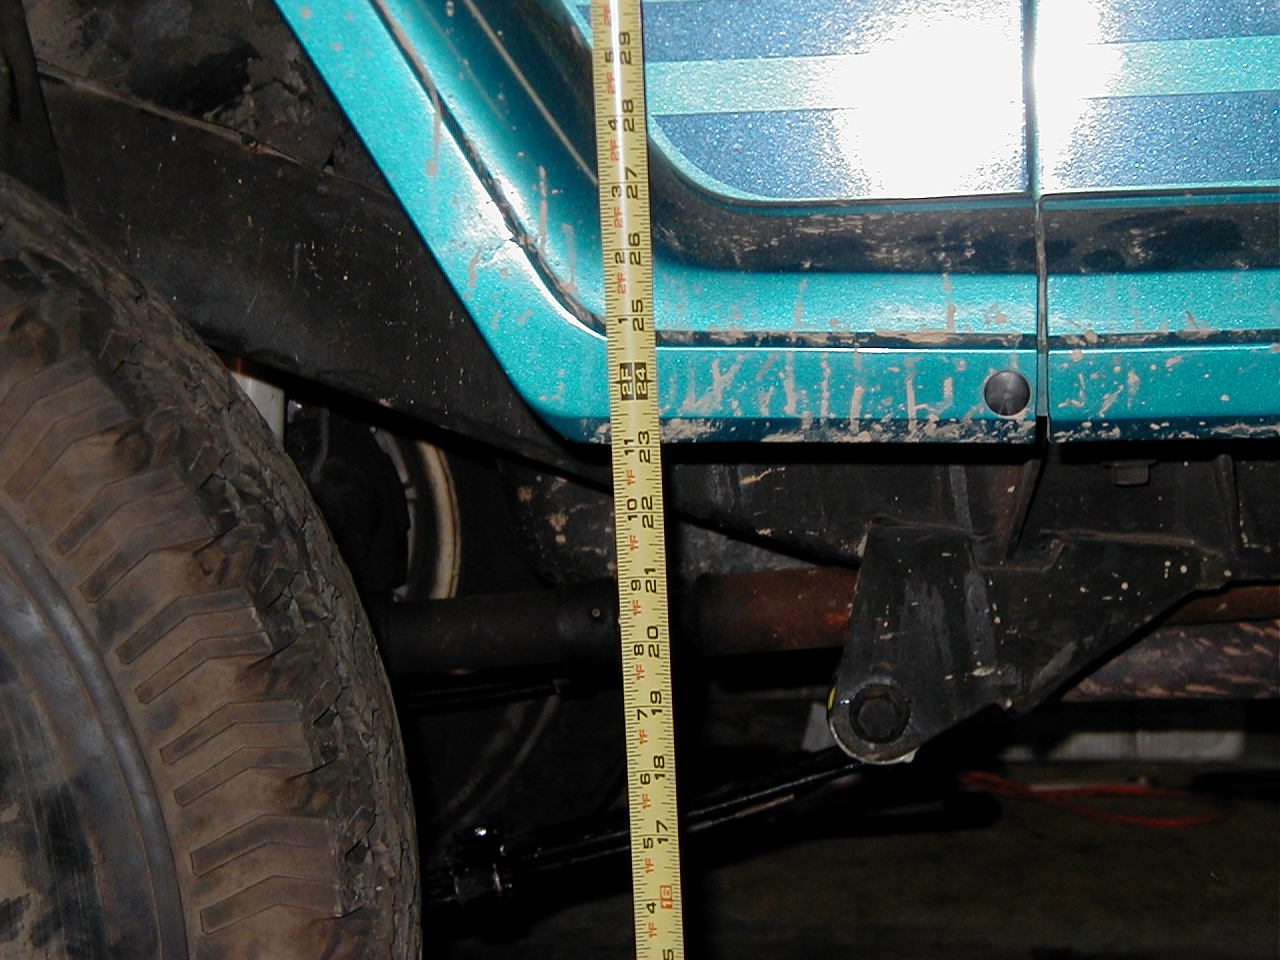
Here is a before picture of the height to the flare of the front end. |
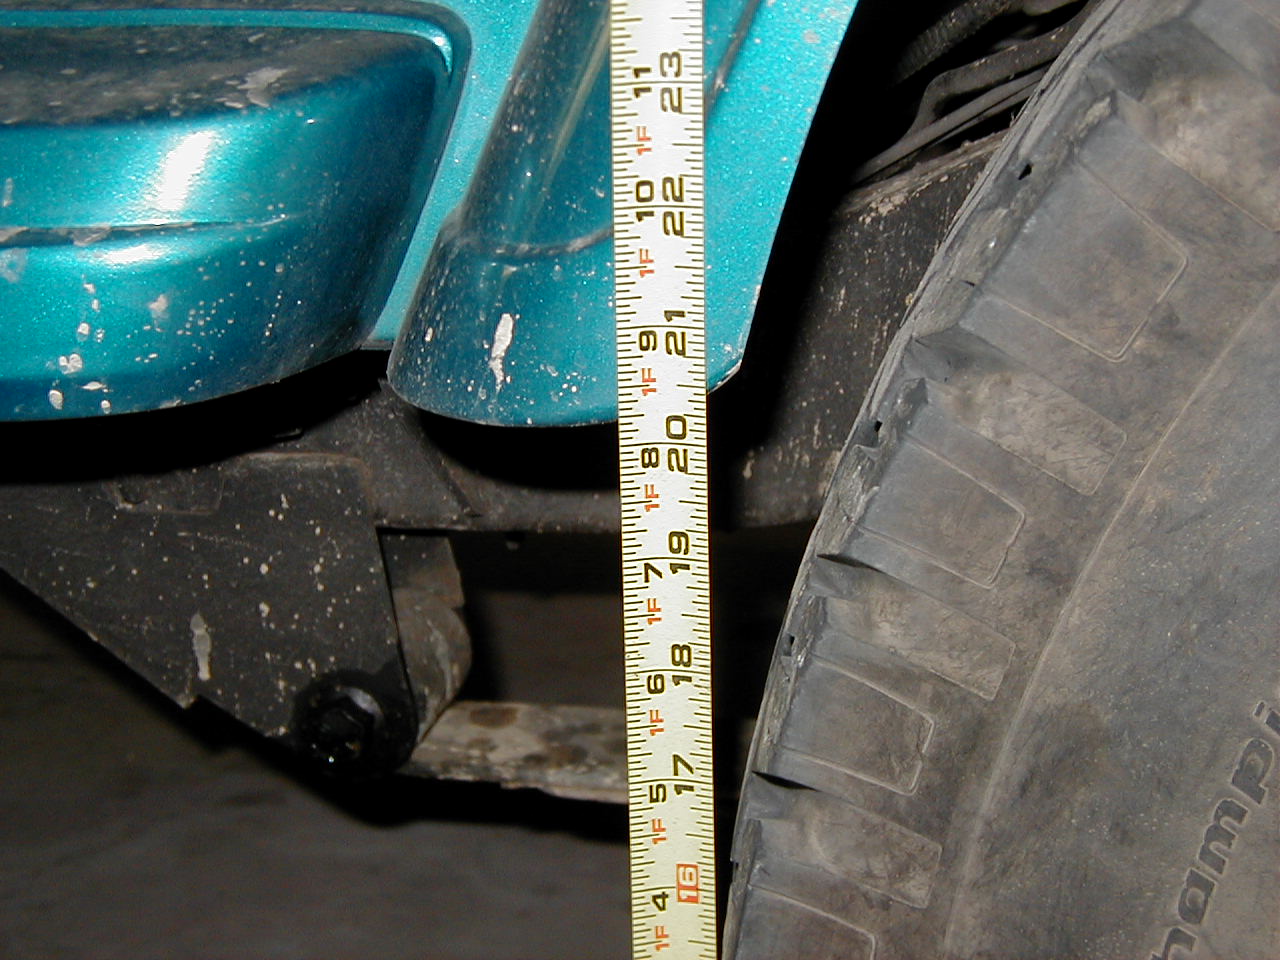 |
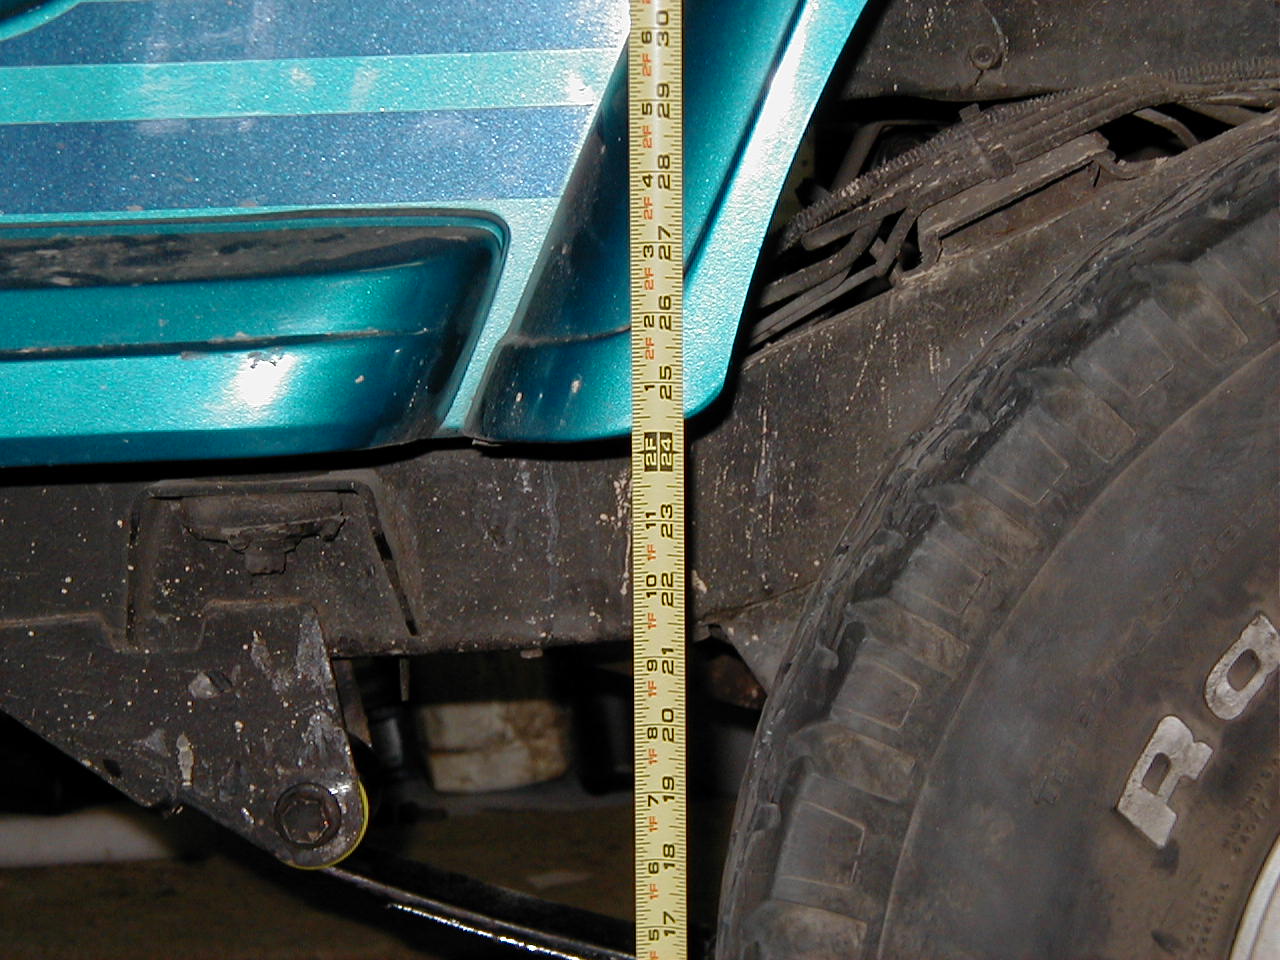
Here is a before picture of the height to the flare of the rear end. |
Day 1 (5/7/2001)
| The first thing I did, as you may have seen on the first page, is coat every nut and bolt on the rear of the Jeep in penetrating oil. I used Liquid Wrench, just because that’s what we had on hand. I let them soak for about a half an hour while I ate dinner, I am doing this install day by day after work, so I only get about 4 hours of work in per day. |
|
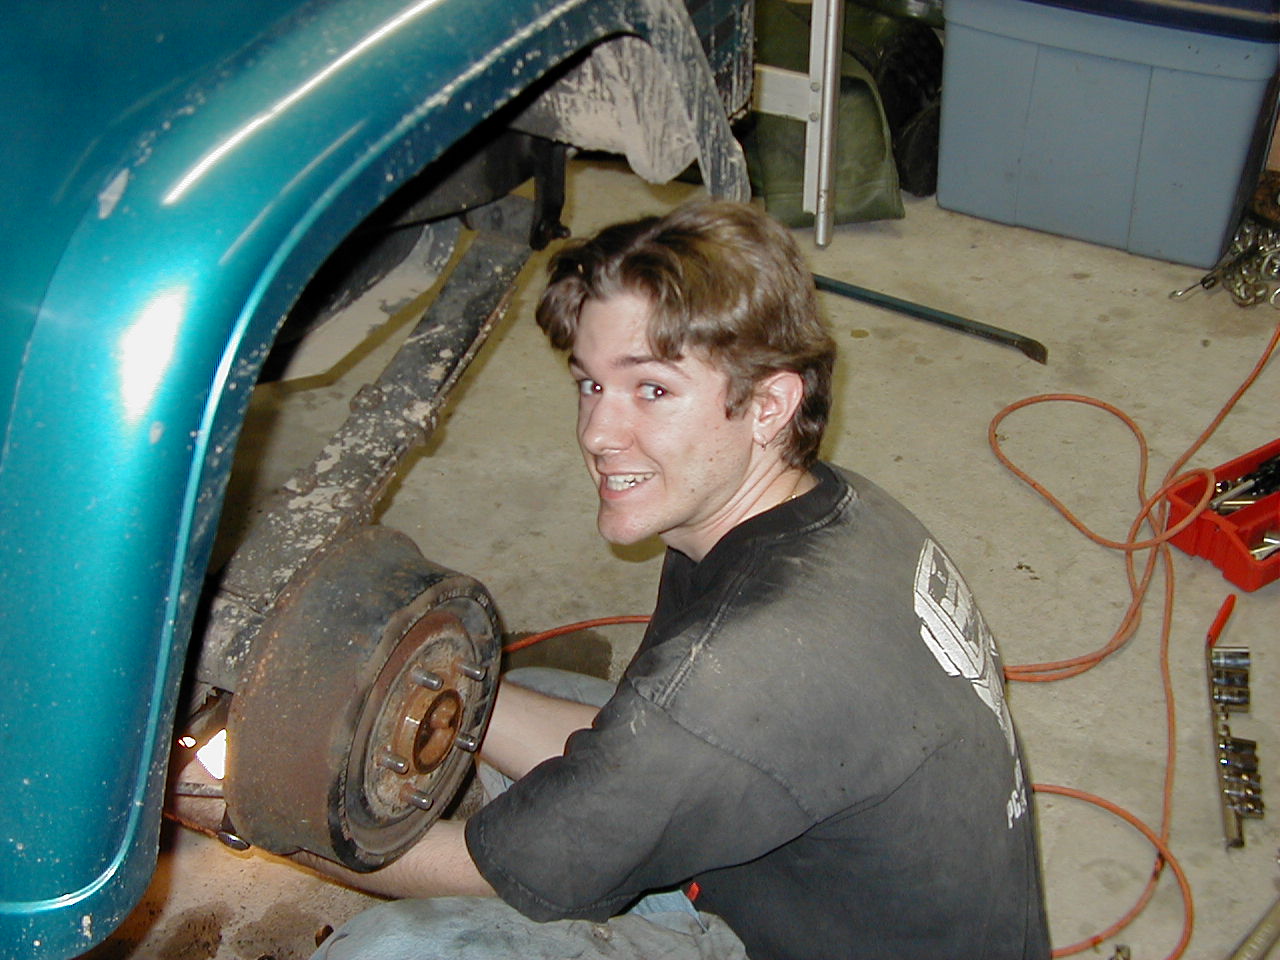
| I didn’t get as many pictures of today as I would have liked, so I’ll just have to be descriptive. The first thing I did was jack up the Jeep, support it with jack stands, and remove the rear tires. I am obviously starting with the rear of the Jeep. |
|
| Now that I have it all jacked up and open, I began to remove the shocks. All of the nuts and bolts were 3/4″. The passneger side shock was bad, and for some reason dented. This shock gave me a lot of trouble. Once I got the top disconnected, I pulled the top of the shock from it’s mount. Once it was loose and dangling, I was able to loosen the nut/bolt that was holding the bottom of the shock on. This didn’t help much because the bolt was somehow seized to the bushings in the shock. A hammer and a crow-bar fixed that, if you go this route make sure you don’t hit the threads on the bolt with your hammer, you’ll never be able to re-use that bolt if you mangle the threads. Finaly, after about 30 min of prying and wacking I managed to get the bolt out! Then my friend showed up just in time to see me throw a slightly mangled shock absorber across the lawn! (Temper Temper…) |
|
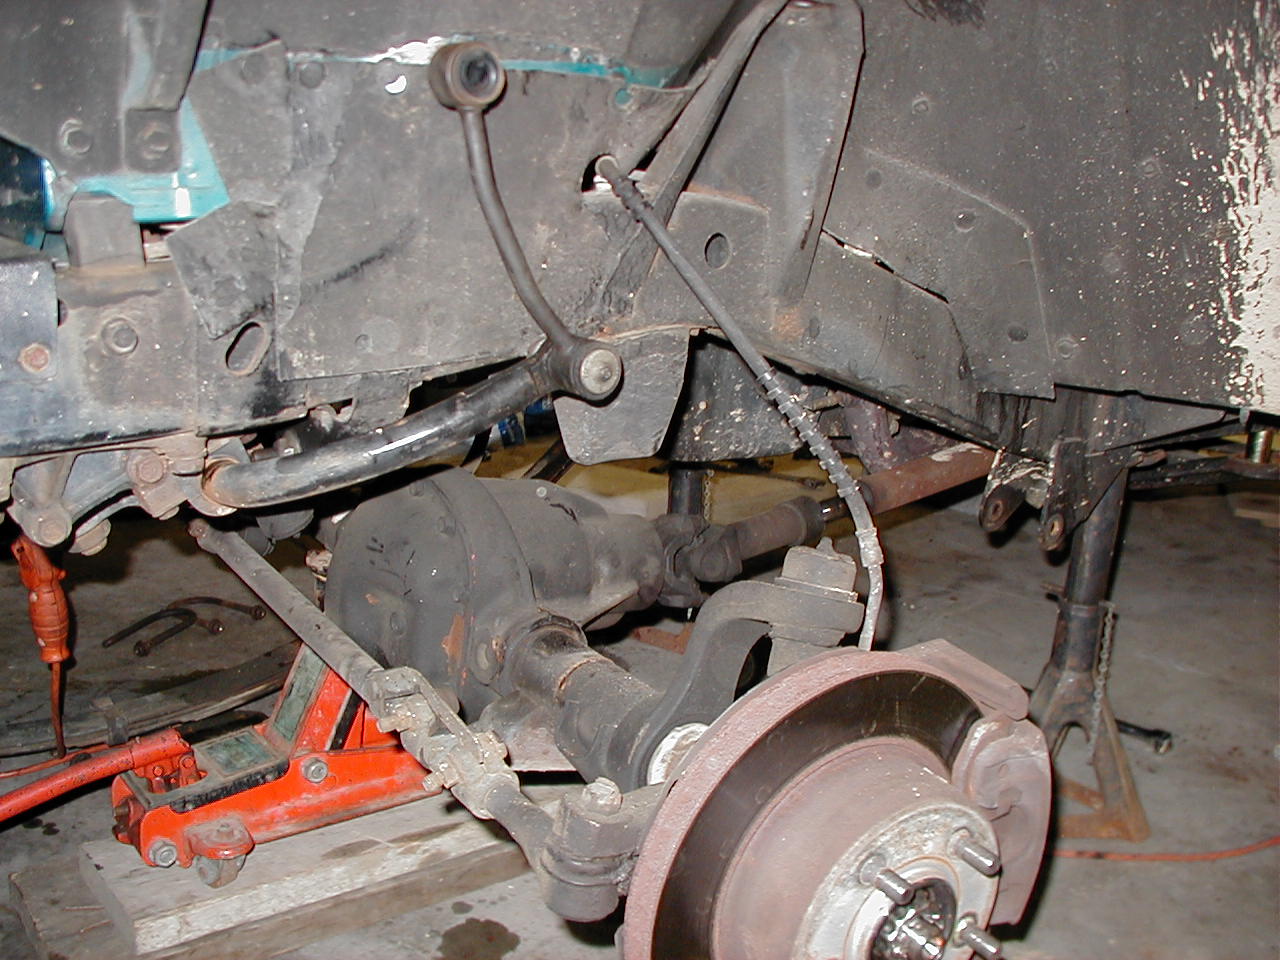
| Next was to remove the rear track bar, this wasnt very hard, I thought it would be a lot harder than it was, taking the PITA that my old jeep’s was into concideration.. It wasn’t that tough though, I just took a T50 torx and put it on the bolt side of the assembly, and put a socket with a breaker bar on the other side, I think the socket was something like 13/16″ or something just slightly over 3/4″. Then I just removed that lower bolt, then repeated with the upper bolt. Once the bolts were out of the way, I just pulled the track bar down out of the upper bolt, and needed something to slightly pry the lower one out. Didn’t even need to exert a lot of force on the lower one, it was just hard to get a hold of. I did not end up throwing this across the lawn. |
|
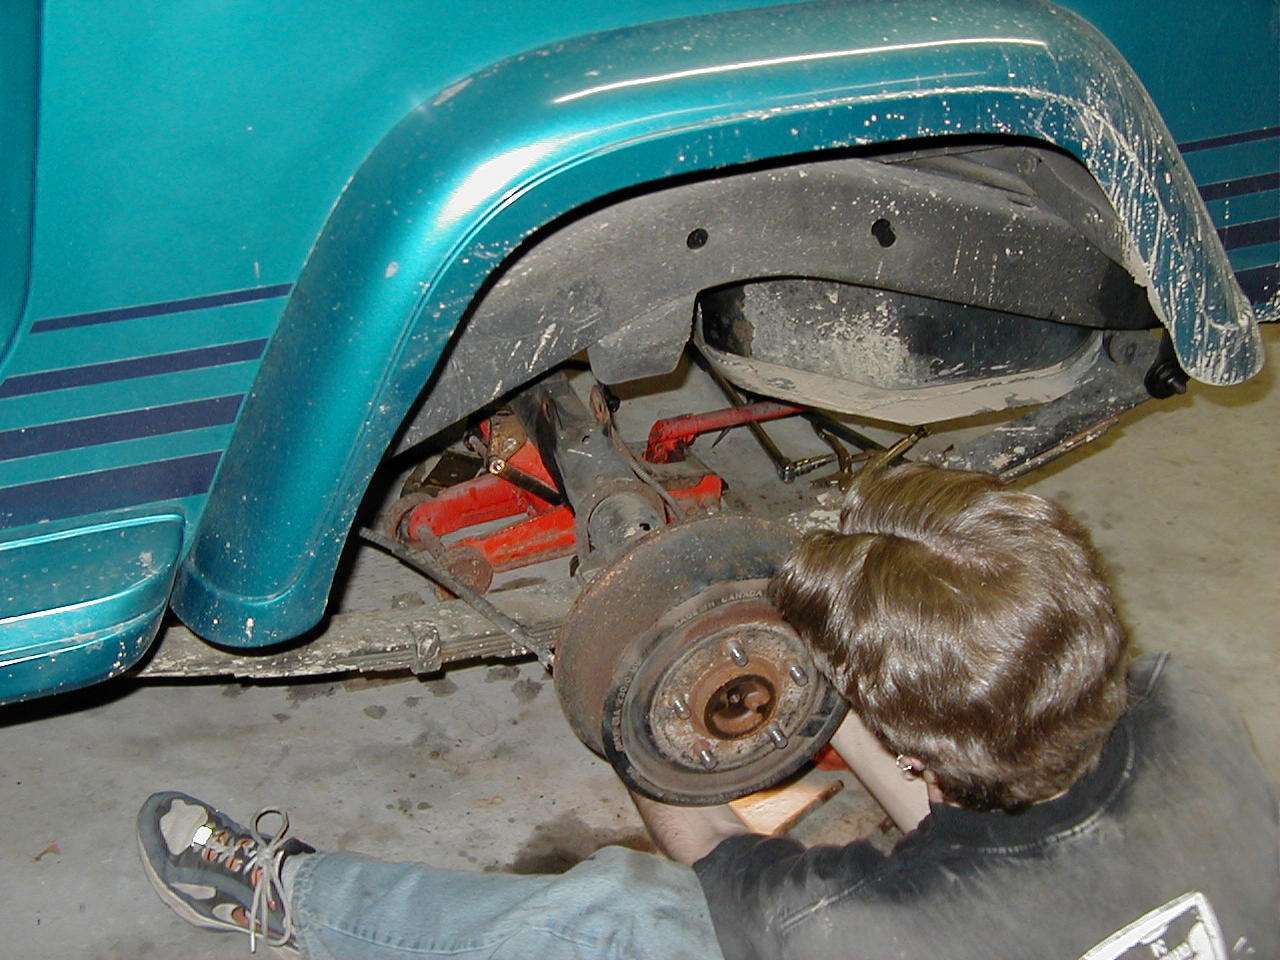 |
Next came the u-bolts that hold the axle to the springs, I shot them up with some more Liquid Wrench and let it soak in a little before starting to wrench. Then I took a 3/4″ socket and my short breaker bar and broke each of the u-bolts lose one at a time. Then I took them off with a normal ratched with the 3/4″ socket. This also went surprisingly well and I didn’t end up throwing any of this across the lawn either. |
 |
Ok, now, the axle is disconnected from the springs, the track bar and the shocks, thats all that holds it in place right? Now we jacked the axle up with a floor jack by the pumpkin to get it out of the way. Once the weight is off the springs its time to take the springs off. We started with the front eye of the spring, the one that attatches directly to the frame without the use of a shackle. Well, these things were REALLY suck! If you look at the picture on the left, youll see that I am actually HANGING on the breaker bar and its supporting almost all of my weight! The breaker bar was attatched to the nut on the back of the bolt thats holding the spring in place. |
| Well, between my friend and I we finaly got the nut off of the driver side spring. Now the bolt is somehow frozen in place, if we try to turn the bolt, it just flexes the spring and eventually makes a “CRACK” noise, moves about 1/4 turn and then freezes again. After about 30 min of beating on this thing, we got it to move out about 1/2″ and we soaked it in liquid wrench and gave up for the night. I’ll probably thorw the spring across the lawn tommorrow when we get it off. |
Day 2 (5/9/2001)
| I wasn’t able to work on this much on 5/8/2001, so my father and I just took enough time to get those stubborn bolts out and get the springs dangling there by the shackles. Just so you know where we are starting from today. |
|
 |
Well, the first thing we had to get done was take the old springs off completely. So we did. I didn’t bother taking the entier shackle off like I had planned. It looked like too much work. Superlift didn’t provide new bushings for the frame anyway, so I’m stuck with the old worn out bushings a little longer. |
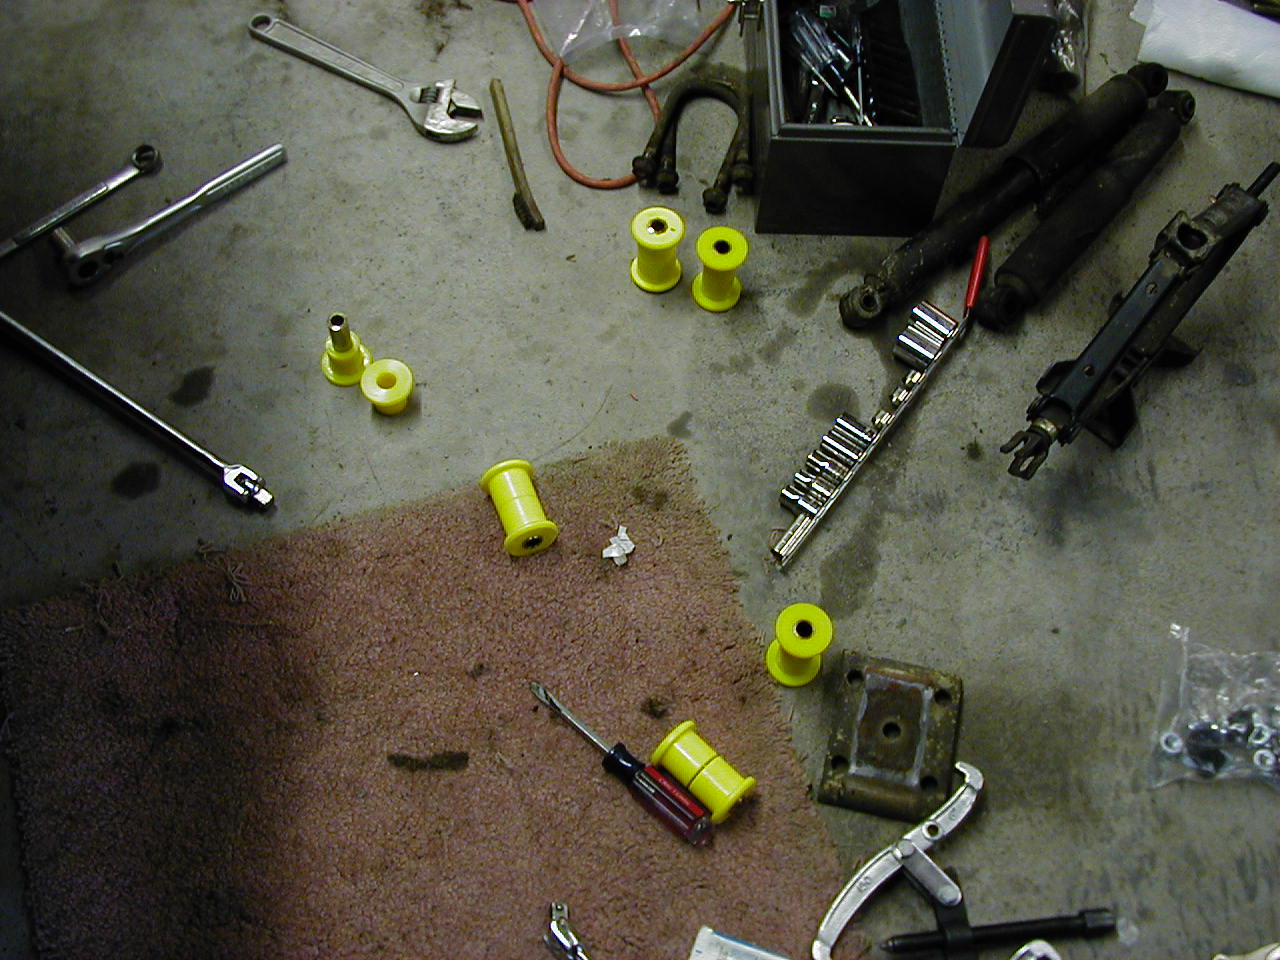 |
To install the new springs, first you have to install these bushings in the new spings, then put the springs into place, and bolt them in. Well, I put the first set of busings into the front of one of the spings, creased them all up and then tried to put the bolt through the center to make sre everything was going to fit. The bolt wouldnt fit!!! Now I’m getting aggrivated already and I’ve just started for the night! (Problem number 1) Ok, so just to see what would happen, i tried putting that bolt through the bushing that was meant for the other end of the spring. Guess what.. IT FIT! The metal tube from the inside of the bushings was what the problem was. So I took the bolt that came out of the shackle and put that through the bushing that was supposedly meant for it. Guess what, the bolt was too small and it rattled around in there. So I took the tube that was meant for the rear and put it in the front and the tube that was meant for the front and put it in the rear. Problem solved! |
 |
Ok, now that I have the right bushings in the right places, I mounted the new spring to the shackle and the frame. Finaly, something that went well, went right in, I had to spread the spring mounts on the frame a little, but I got it in there. Now, lets get the axle mounted shall we? |
 |
Of course we had to have another problem. (Problem 2) The screw/nut that hold the spring pack together and hold the shim on are too big to fit into the hole in the spring-perch and the u-bolt plate. So, we got ourselves a 3/4" drill bit and re-drilled the hole in the u-bolt plate so the bottom would fit. The spring perch however was a little more complicated. We couldgt get a drill at the perch, so we had to grind the screw head a little. We just took a small grinder and ground away at the little post that was sticking up until it was small enough to snuggly fit into the hole in the pirch. Problem solved! |
 |
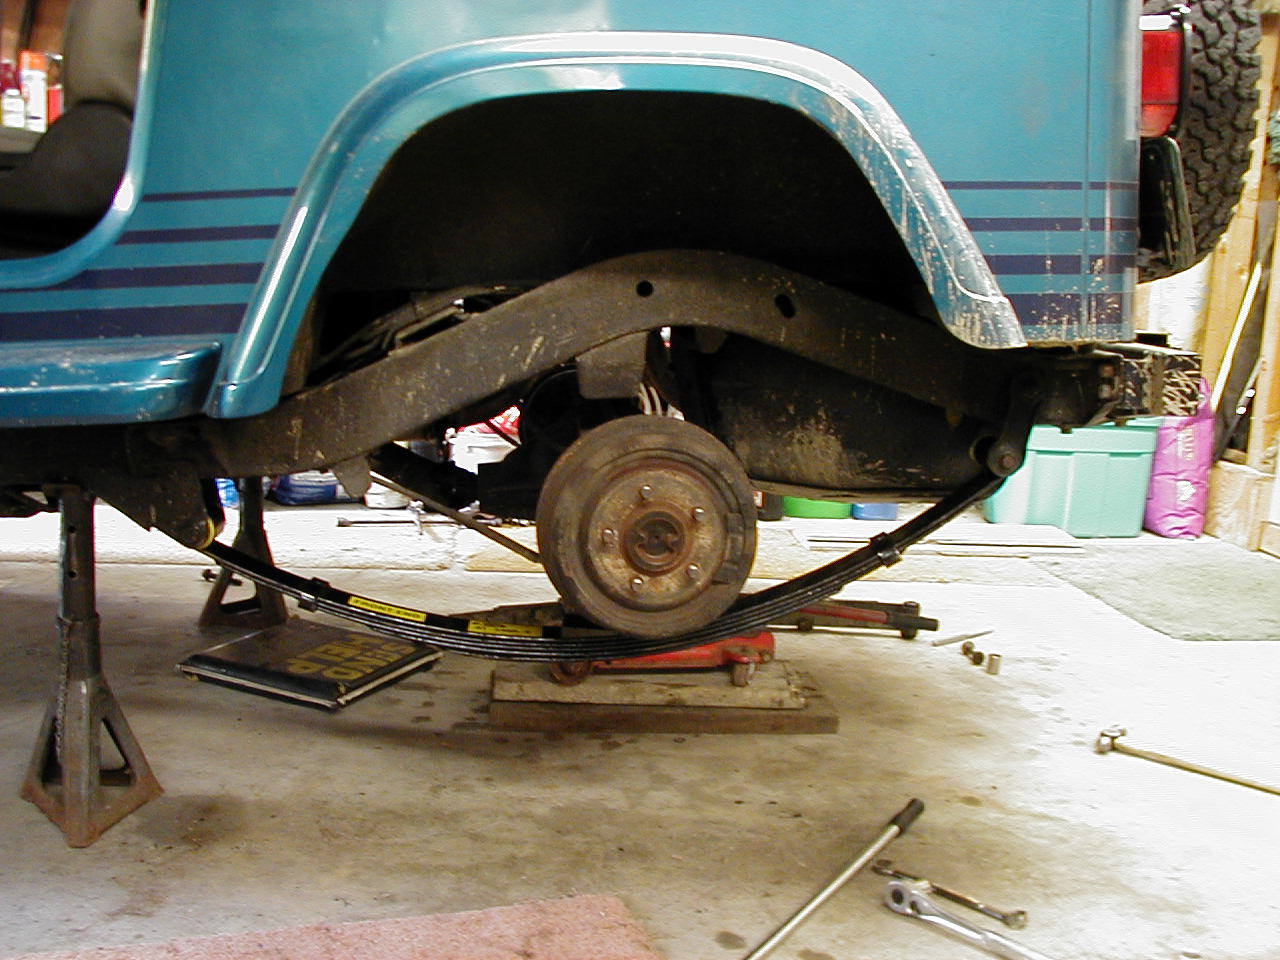
Now, with the axle seating correctly on the spring, we could attatch the axle to the spring and the shock to the axle. This wasn’t too bad of a job, it all went together pretty easily. This pic is the almost finished product. We still had to bolt the axle to the spring at this point. |
 |
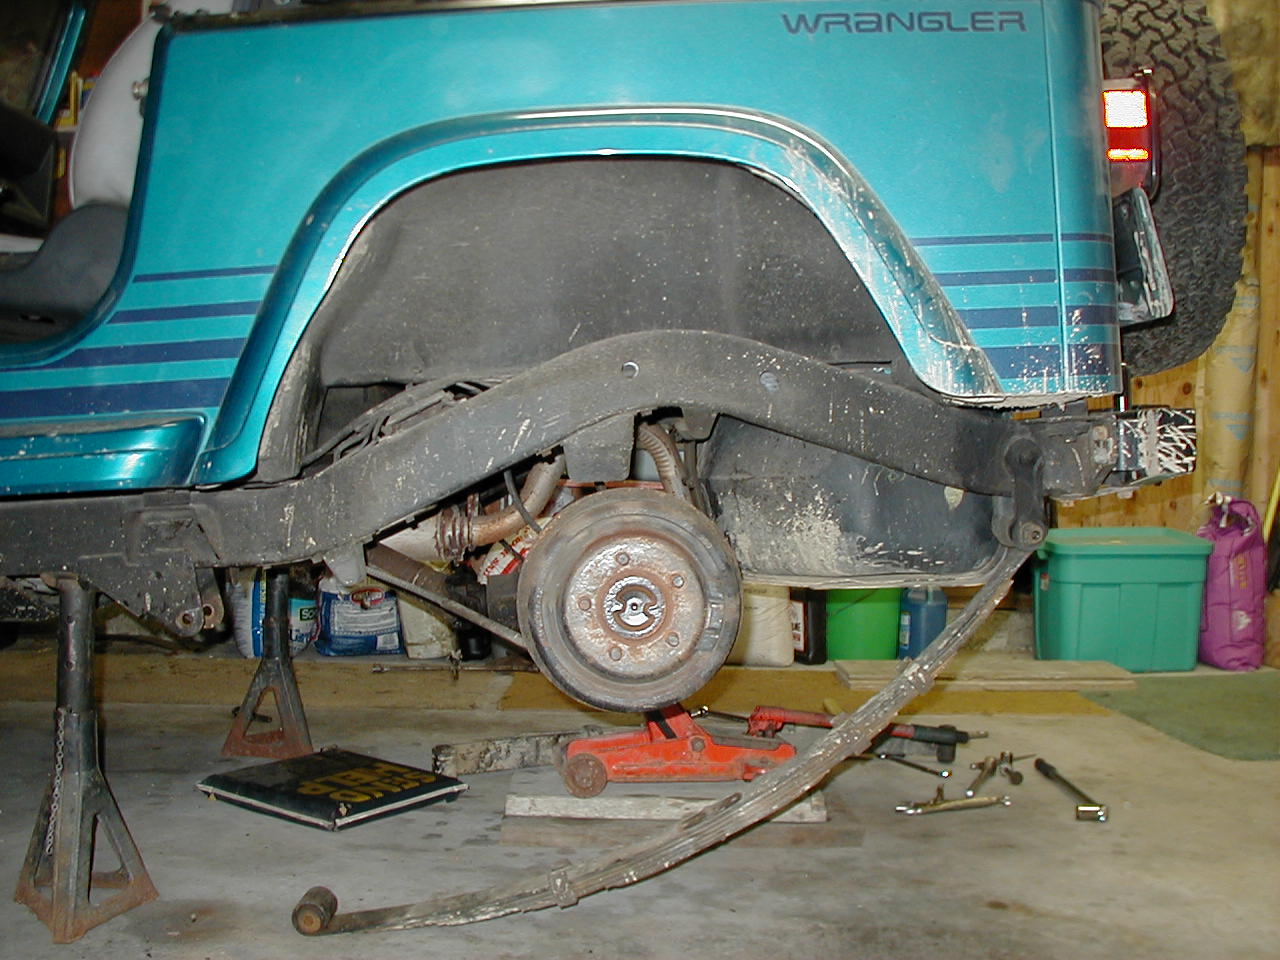
Well, here is the rear passenger side fully assembled, except for the track-bar relocation brackets they provided, I decided to trash the track bar. Maybe I’ll put it back on for inspections, but thats it! Take note of the new bump stop that Superlift provided. I don’t know how nessessary it is, but with my brake lines being a little on the short side, ill keep them on there until i get them lengthened. The driver side stop had 2 little feet things on it that go under the u-bolt, but all the rest of them only have 1. I don’t know why, they dont explain it. |
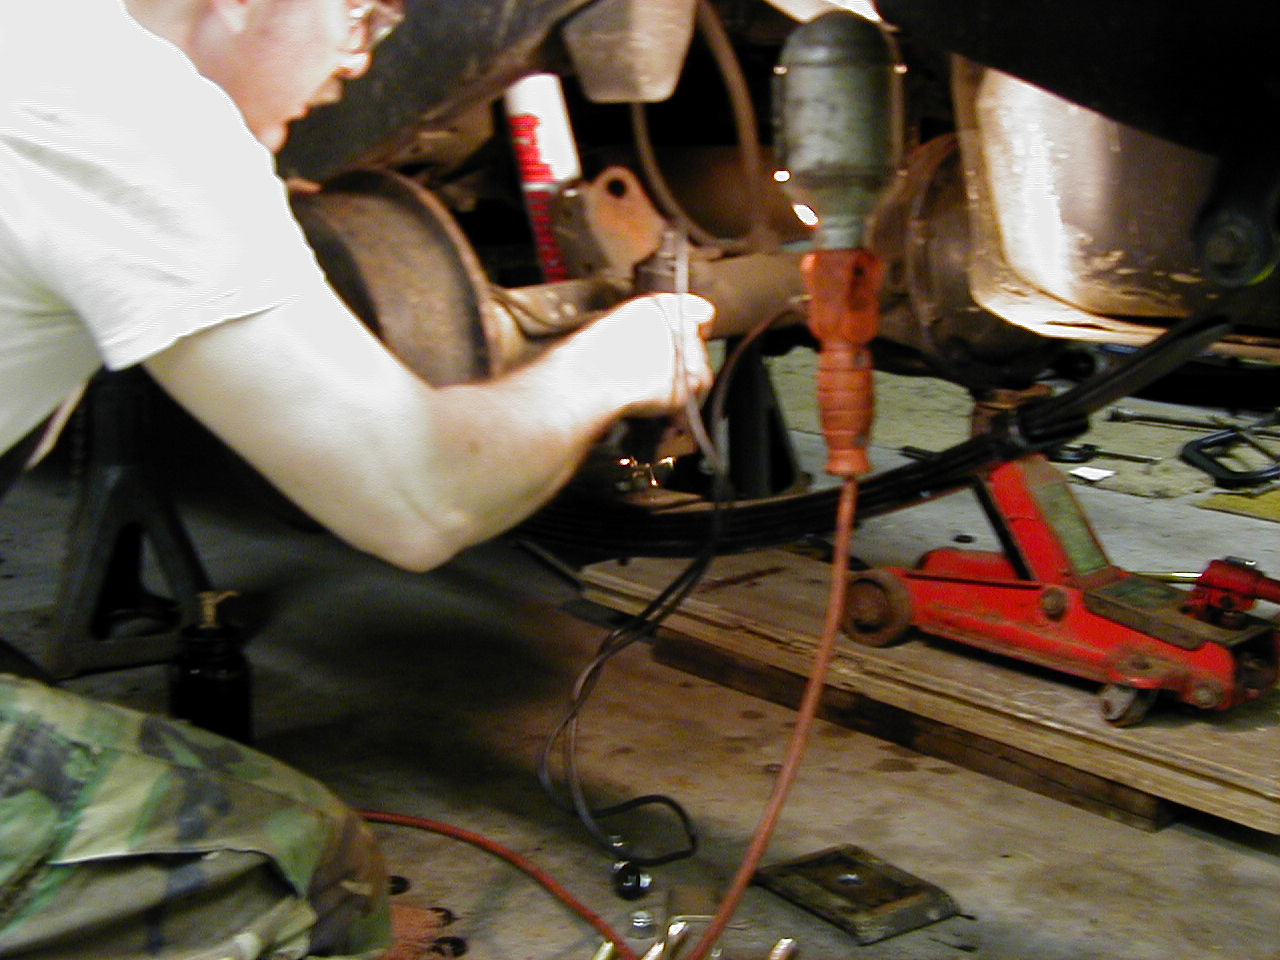
| Now we had to install the t-case drop kit. This was a chore in itself. We suported the skid plate with a floor jack. Then removed the bolts that hold the skid plate to the frame. These are 3/4″ hex-heads, and they might be stuck by rust, or other gunk, but they’ll come out. Once they were out we lowered the jack a little, just enough to get the spacers in there. Then i had to thread the new bolts into there. They were inverted hex, or better known as alan keyed. The only alan keys that I had were normal l-shaped keys. So I really didn’t have any leverage. So I took a small piece of pipe and used it along with the alan to get enough leverage. This worked ok, but when I got everything tightened, 2 of the spacers were still loose! I removed one of them and put some washers between the frame and the spacer, so one is now tightened. But I didn’t have enough washers for both of the loose ones. So one still rattles! Oh well, I am going to put an SYE in sometime soon anyway. | |
 |
Here it is, we just had to throw the tires back on and that was it. The rear end was done. Now it looks like some sort of dragster. Front end is tommorrow! |
Day 3 (5/10/2001)
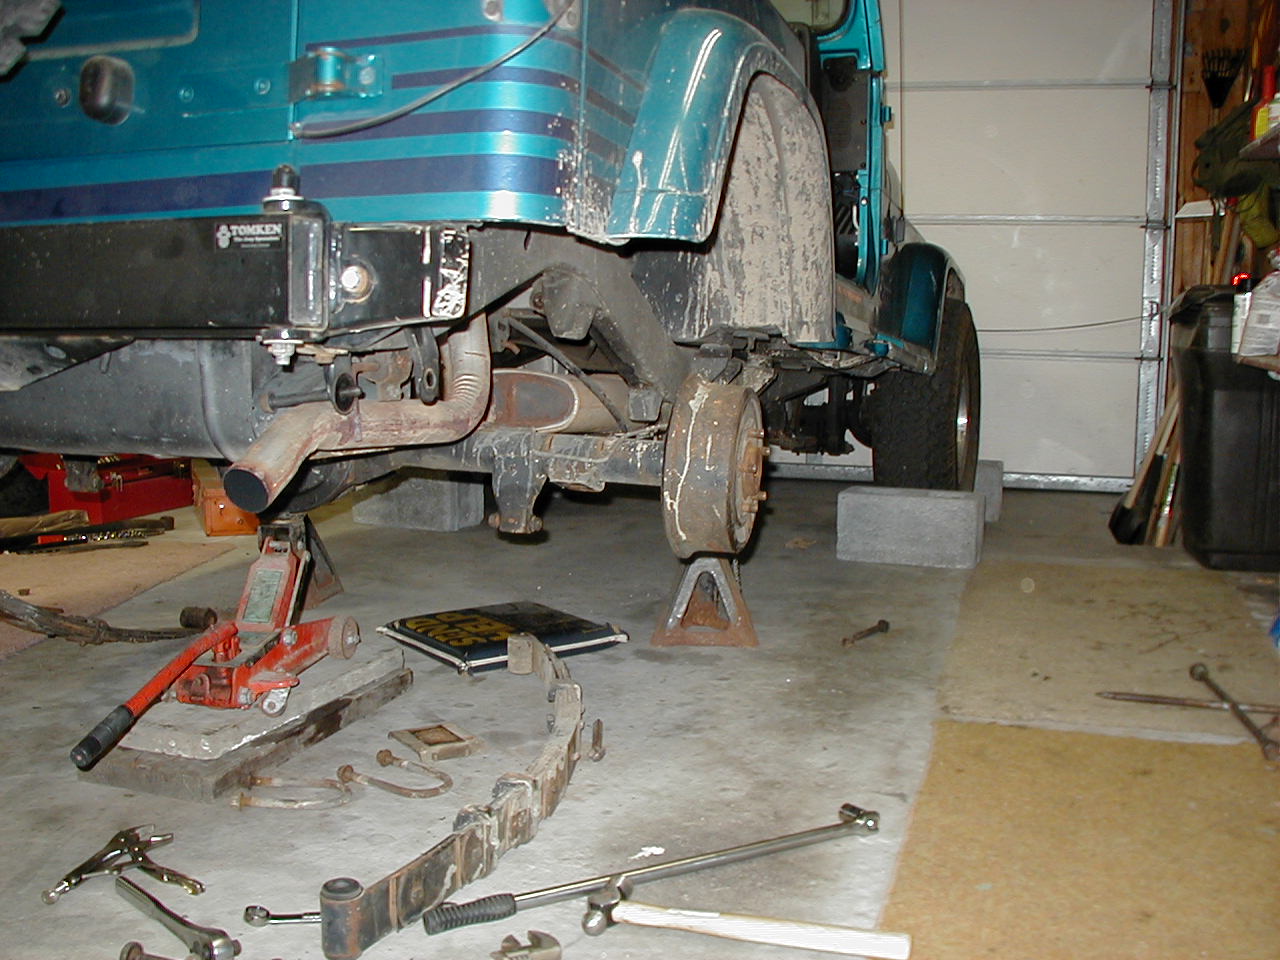
| Did I mention yesterd that I hate that t-case drop kit? It not only lowers ground clearance, but it just looks bad! Gotta get an SYE thats all there is to it… | |
 |
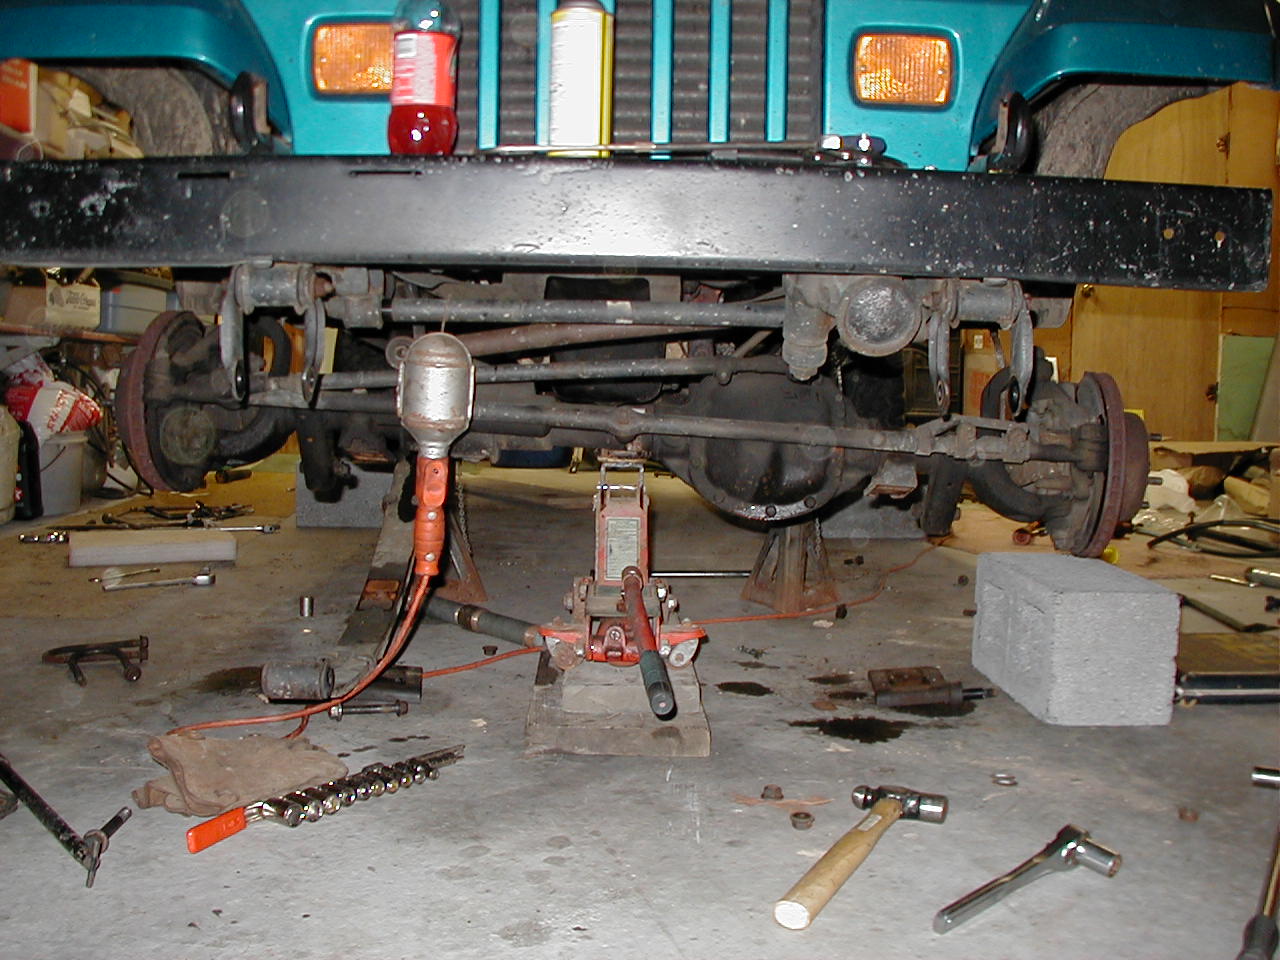
Whew, ok on to the front end. The first thing to do is give everything another shot of Liquid Wrench. Then jack it up. This pic is right after I jacked up one side of the front, it just shows a little flex in the rear. This Jeep is crying to be played with! Well, on to the install. I got a few pictures of this, but half of them are on my buddies digital camera and he didn’t leave the card with me to copy them, so this page will be a little incomplete until I get those. |
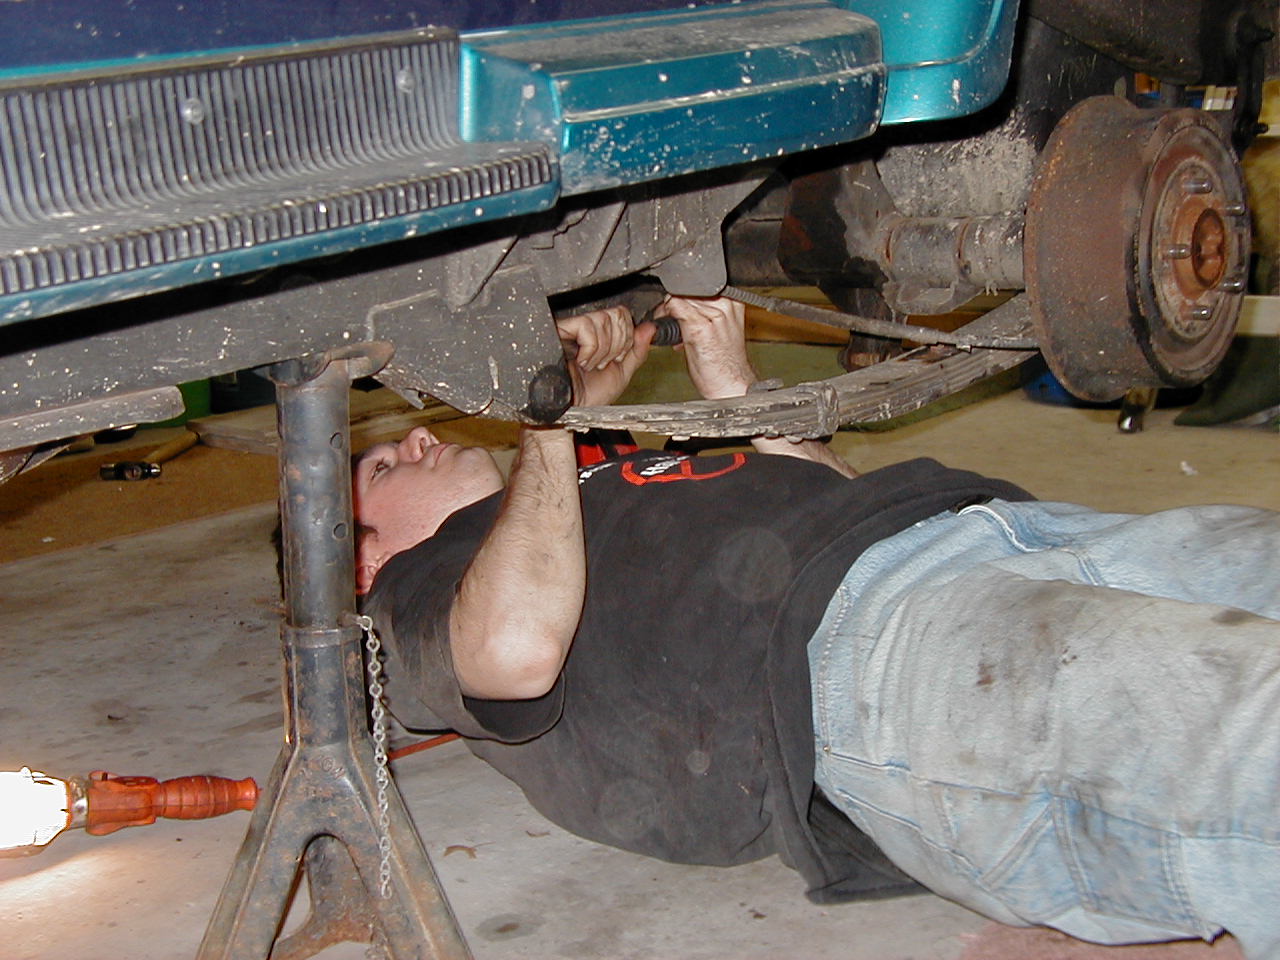
| Well, I got the front end jacked up, supported on those old jack stands, and took off the tires. I loosened the sway-bar links up and took off the nuts that hold them in place. The upper one has a cotter pin with a castle nut. You have to take the pin out with some needle nose pliers or something and then take the nut off. I don’t know why they put the pin in this one, it’s not like it’s going anywhere. I managed to move the bottom of the sway bar link, but the top, it is so jammed in there that it wont budge. While i was working on the sway bar links, my father was working on the rear bolts holding the spring to the frame, and my buddy was working on the shackles. We got one of the frame bolts removed, and we got both shackles loosened up. |
|
 |
Now it’s time to get the shocks off. I started on the drivers side. I detatched the bottom of the shock with little difficulty, but the top, thats another story. We took a pipe wrench and put it around the shock, then took a wrench and tried to take off the nut on top. It didn’t work, it just ended up spinning around in the pipe wrench. Ok, new plan of attack. There’s 2 flat sides on the top of the shock after the threads stop, so we took a small wrench and put it on there and then wrenched on the nut, well, after a few cranks we broke the little wrench, it was a craftsman, so Sears, here we come! So, now that weve made no progress and broke a wrench I started thinking, I grabbed my vice-grips (big mistake, me with vice-grips!) and opened them up as far as they could go then clamped them onto the shock. They slipped off after about one turn and hit me in the knee! Al-right thats it! GET THE HACK-SAW! We finaly cut the threads of each shock off to get them off. Worked well, except that it wasted a good 15 min per shock. |
 |
Now that we had both shocks off I was able to get the u-bolts off. Got the bottoms of the sway bar links off, but the tops still wont budge, I soaked them in Liquid Wrench and decided to work on them tommorrow. I pulled the sway bar up and out of the way and jacked the axle up and off the springs. Sudden obervation from my girlfriend: “Hey, it looks like that side of the thing is going to fall”. She was referring to the side of the axle witht the pumpkin. I looked and said “Wow, youre right” so i put a cinder block under the rotor just in case it started to fall it would only have about an inch to fall until it contacted something. |
| Ok, now it’s time to take the springs off. The shackles were already loose on the bottom so all i had to do was loosen the tops and then pull the botls out of the bottoms. I can get to these a little better than i could the rear, so ill greece these a little better. Haven’t done that yet, I’ll do that when I put the new springs on tommorrow. | |
 |
Well, here it is, this is where I stopped for tonight, im tired and I ended up working alone with one spectator, my father left around 7:45PM and my friend left around 8:30PM so from 8:30 until about 9:45 when I stopped I was working on it by myself, but I’m not complaining, I’m enjoying this! On the bumper you can see my friend the Loquid Wrench, it’ll be your friend too, theres also a bottle of that new Mountain Dew Red Alert or whatever, I wouldn’t recommend that stuff, it tastes like carbonated Hawian Punch! Not a good combo. |
Day 4 (5/11/2001)
| Ok, here we go, the fourth and hopefully final day of the install. It’s friday, and I am determined to get this thing finished tonight! | |
 |
Well, we’ve got the springs off, and everyting else is already disconnected from the night before, so its time to start assembling. The only things left to take off were the sway bar links. A poster on Jeepaholics Anonymous suggested I use a “Pickle Fork”, which turned out to translate to a ball-joint removal tool to remove the links. We wedged the tool between the sway bar and the link and started hammering, just when we thought it wasnt going to work POP it came off. I might add that this is exactly how the poster described it to me! So now those are out of the way. |
| Now that those are off we are free to begin installing things. First we put on the tops of the front shocks. this wasn’t a hard task. Once they were mounted we compressed the shocks to keep them out of the way and started working on the springs. The only problem we ran into with the springs was that we had to spread the rear spring brackets apart. They were a little too close together to fit the new springs in. We used a cro-bar and a “port-a-power” to do this. Once we got past that things were ok. Once we had the springs mounted, we had to bolt the axles onto them. Again, this wasn’t hard, we just lowered the axle onto the springs, then lined up the plates and put the u-bolts on. Also remember to get those sway-bar links in place before tightening up the u-botls. Once we got the axle into place we realized one thing, we never put the brake line extender thingeys on. So we started to figure them out. The directions they give you arent very useful. They pretty much just show you a picture and hope you can figure it out from there. What you have to do is this. You remove the one torx bolt that holds the brake line to the frame right above your axle. Then you put this bracket they give you on in its place. then you have to gently bend your hardline so you can get enough space out of it to get your brake hose and it’s existing bracket out to the outer hole in the new superlift bracket. Then you use a nut/bolt combo that superlift gives you to attatch the brake hose to the new bracket. Sounds easy right? Well the passenger side wasnt too bad, but on the driver side we had to remove the airbox and the drill a hole in the airbox bracket to get to the torx bolt. Kind of a PITA if you ask me, but it worked! | |
| We tried to remove the track bar as I have a telescoping track bar on my old jeep that is getting switched over, but we didn’t have the right torx bit for it. So we just used the track bar relocating bracket for now. It wasnt hard to install, but they didn’t specify which bolts to use for it, so we guessed. Ended up using the two black bolts, there were also two silver bolts, but they didn’t quite fit right. Hopefully sometime this week I will get the correct torx and get the telescoping bar in place. | |
 |
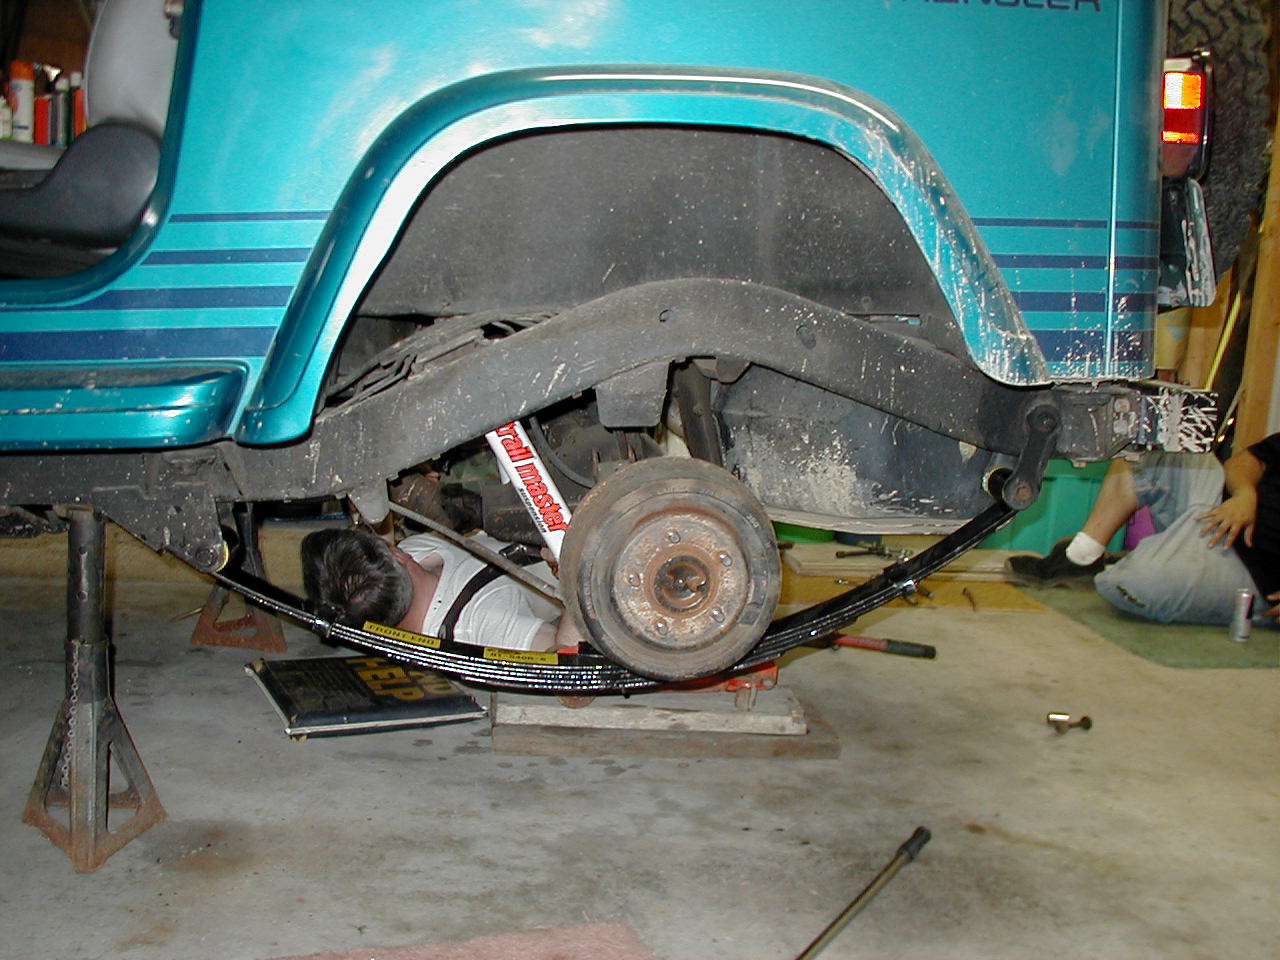
Once we got the track bar all mounted up, we attatched the bottom part of each shock. Again, not a hard procedure, the hardest part was getting the things lined up right. Then you just put the bolt into place and put the nut on the back. Then Wa-La, you’ve got one complete suspension! I’m sure there were some things I left out of tonight because we finished up at 11:30PM and I was a little tired. Of course I took it out for a ride though. The only thing I noticed that bothers me is that my brakes dont seem as responsive as they used to be. I am going to look into that tonight. They still stop me, but they seem to get a lot closer to the floor before they start to grab. |
Conclusions and opinions
| |
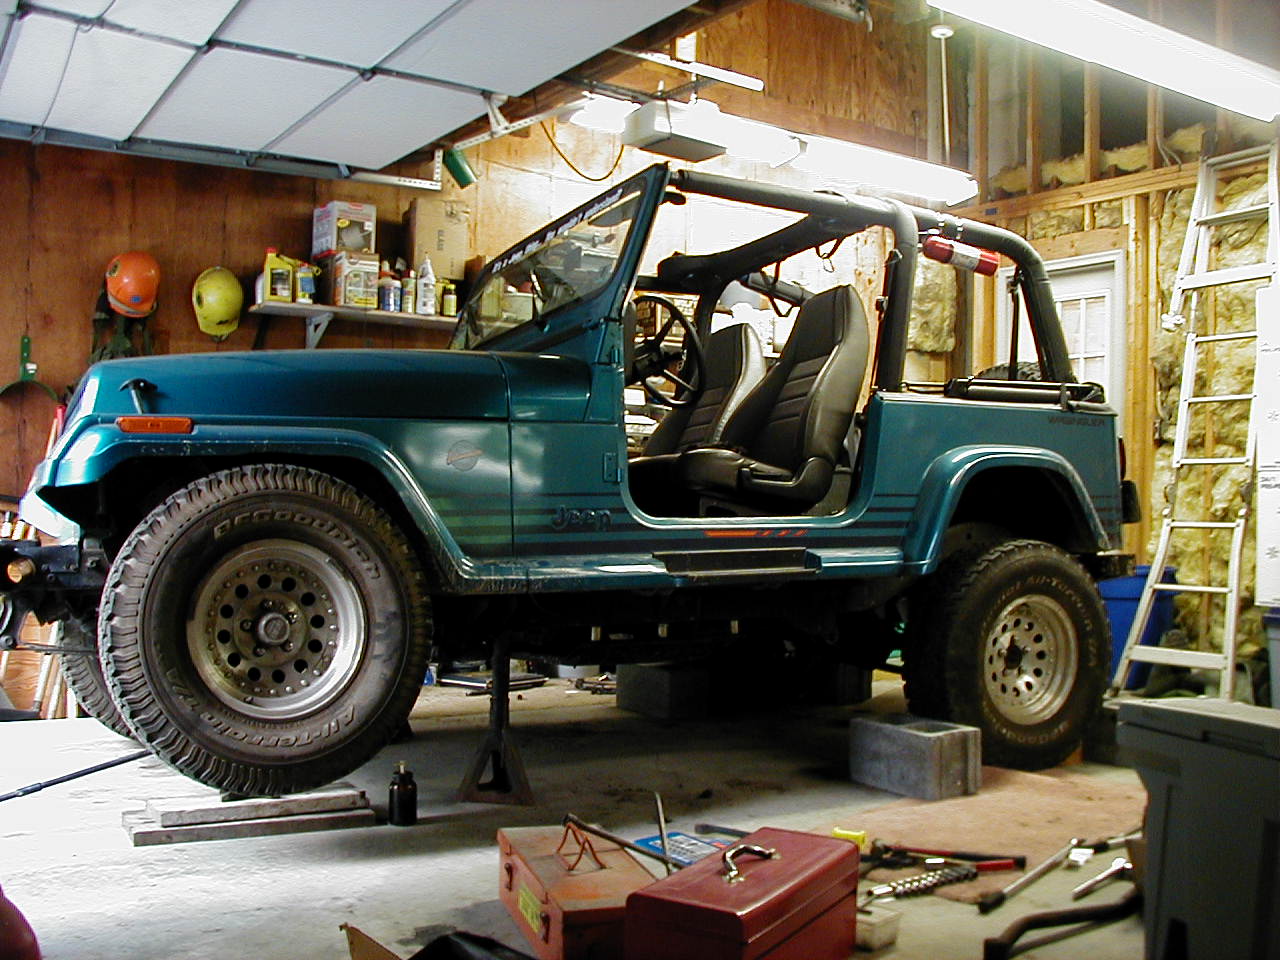
So, here we are, one freshly lifted 1992 Jeep Wrangler YJ Islander. Looks good doesn’t it? Here you’ll find some of my thoughs on the lift and some before/after pictures. |
|
Measurement to the bottom of the front flare before the lift: 18.5″ |
 |
Measurement to the front flare after the lift: 23″ Difference: 4.5″ |
|
Measurement to the rear flare before the lift: 20″ |
 |
Measurement to the rear flare after the lift: 24″ difference: 4″ |
| My opinions: | Overall this was a much better kit than my old jeep had. I put a 2.5″ SkyJacker lift on there and it was so incomplete it wasnt funny! At the moment the ride is a little rough, but that will probably change after the springs break in a little. Overall the lift on this Jeep compared to my old jeep are about the same, but this jeep with the superlift lift just looks a lot higher and tougher, i am going to pull the old jeep out of is spot and compare them someday just to see, but it looks and feels higher. I didn’t much care for the t-case drop, but hopefully I’ll replace that with an SYE sometime soon anyway. I didn’t really care for their brake line relocation idea, I feel like i broke something doing it that way, and they don’t concider the rear lines at all. they seem to be at the limit and I’ll need to extend them before I can do any flexing back there. |
| Ride and Driveability: | Right now the springs are a little stiff, I think this will go away as the springs wear a little. I took the jeep on an old logging sort of road yesterday and aside from the stiffness it worked well. The road wasnt exactly a tough climb, but I don’t know if i would have made it with my no-flex stock suspension. Once I get those brake lines extended I will do a few tougher trails to see how it performs. |
| Update: 4/3/2002, Front Brake Lines: | Today I went out to the rear lot where I work for a mid-morning break. I went to the jeep and just happened to look at my passenger side tire (the inside wall) and noticed that there was a line around it as if something was rubbing. I kneeled down to investigate and found that my brake line had been rubbing on my tire! I am not sure how long this has been going on. I rotated my tires about a week ago and didnt notice it then (but i wasnt looking for it either). The line is a bit worn, the rubber is worn off and just the steel inner lining remains (on that spot). I have temporairily fixed this problem with some zip ties, i willr eplace the lines and come up with a more permenent solution shortly. This appears to have been caused by the Brake line relocation brackets that SuperLift provided with the Lift. Perhaps they made the lines too long, or it may just be a bad angle from the frame. I will investigate further once I get replacement lines. |